Facebook Login Widget (PRO)
This is a Social Login plugin. It supports login with Facebook, Google, Twitter, LinkedIn, Amazon and Instagram accounts. This plugin also support default WordPress user login. Login with Microsoft and Yahoo accounts are also supported using Addon. The interface and setup of this plugin is very simple. The Setup instructions are provided below. This plugin now comes with 2 FREE Addons Content Restrict Add-on and AP Email Template Add-on.
$
4.00
$10.00
This
plugin is tested upto
WordPress (Version 5.1.1)
Shortcodes & Features
Use this [fb_login_pro title="Login"] shortcode in your page or post if you don't want to use this plugin as widget. ( "title" is optional ).
Use this [forgot_password title="Forgot Password?"] shortcode in your page or post to display forgot password form. ( "title" is optional ). Users will be able to Reset their password in case they don't remember their password. New password will be E-mailed to user's email address.
Set Facebook Profile image as Avatar.
Users can be redirected to a specific page after successfull login. This after login redirection page can be selected form plugin settings section. If no page is selected then users will stay on the same page.
Admin panel access can be Restricted by user Role. You can Disable Admin Panel Access from specific user types. For example you can restrict Admin Panel access for "Subscriber" and "Contributor" from your site. If you have Custom user Roles then that Role too can be restricted.
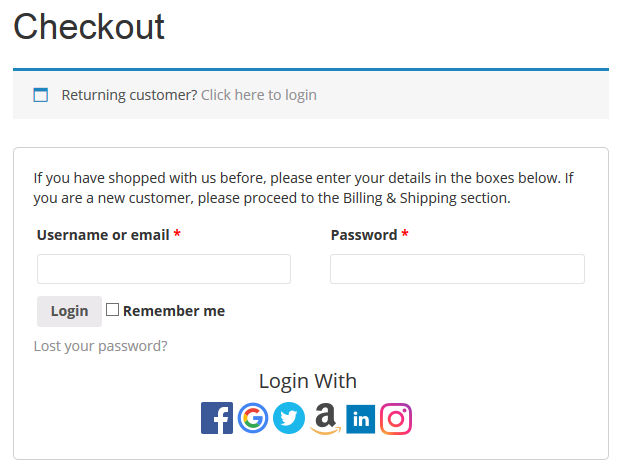
Plugin is compatible with WooCommerce. Social Login Icons will appear at the bottom of the WooCommerce login form.
User's Name will be used as the Display Name in the login widget after successful login.
IP will be blocked for a day after 5 Wrong login attempts. This will ensure your site's security. Blocked IPs can be removed manually from plugin settings page.
IPs can be blocked Permanently. Users from blocked IPs will not be able to login to the site.
Compatible with WordPress Multisite Installation.
Compatible with WPML plugin.
Feature Details
Login Using Only Social Login Icons
Use social login feature separetly. Using this function in your template file <?php if (function_exists('fb_social_logins')) { echo fb_social_logins();} ?> will include social login icons in your template. Users will be able to login to your site from these icons also. With this feature you will be able to use Facebook Login Widget (PRO) with Other Plugins as well.
Example code to display social login icons in WordPress admin login form. This code can be used in theme's functions.php file
add_action( 'login_footer', 'fbsl_login_footer' );
function fbsl_login_footer() {
echo fb_social_logins( false );
}
WooCommerce Plugin Compatibility
This plugin can be used with WooCommerce. If enabled then Social Login Icons will appear at the bottom of the WooCommerce login form. Social login Icons will appear in the Checkout page and in every other login form of WooCommerce.
Forgot Password Form
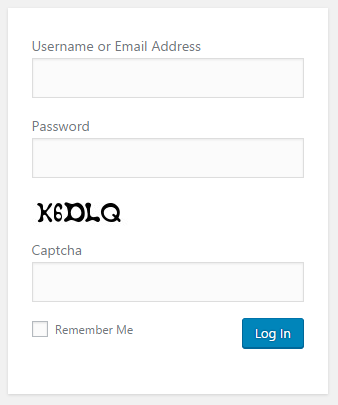
Admin Panel Login With Captcha Security
Social API Settings Section
Social API/ APP setup details for Facebook, Google, Twitter and LinkedIn are provided below.
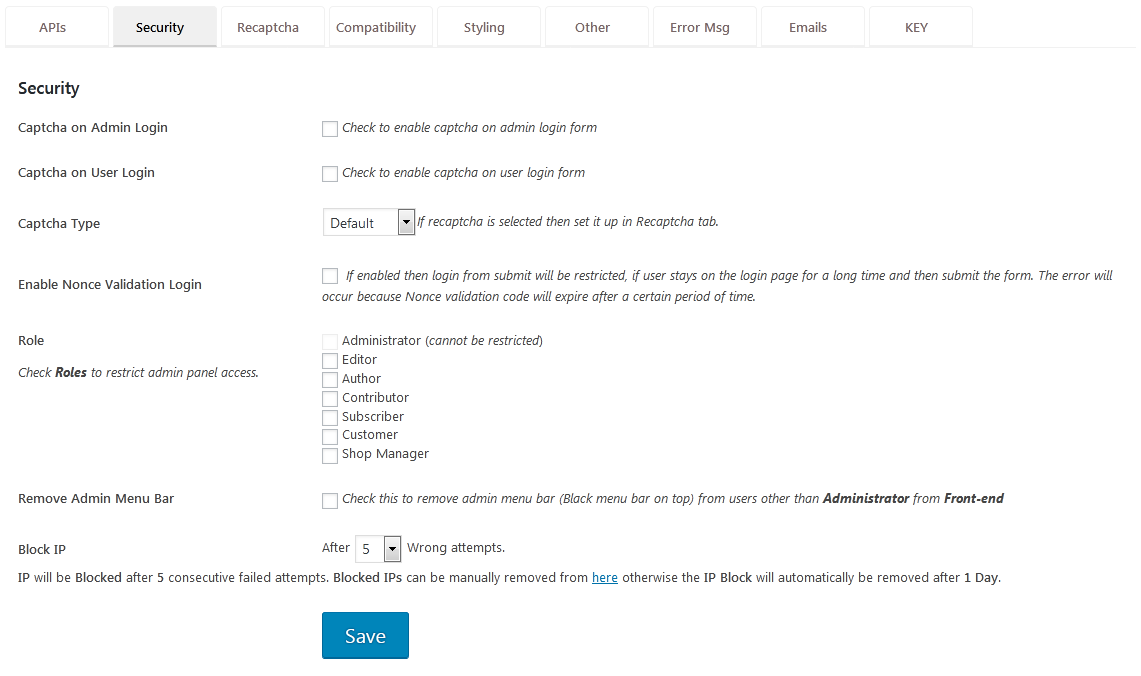
Security Settings View
Captcha Security with option to set number of wrong attempts before the IP gets blocked. Admin panel access can be Restricted by user Role. Users with selected Role will not be able to access Admin Panel. Admin menu bar can be hidden from users other than Administrator.
Compatibility Settings View
Plugin compatibility option with other plugins.
CSS Style Settings View
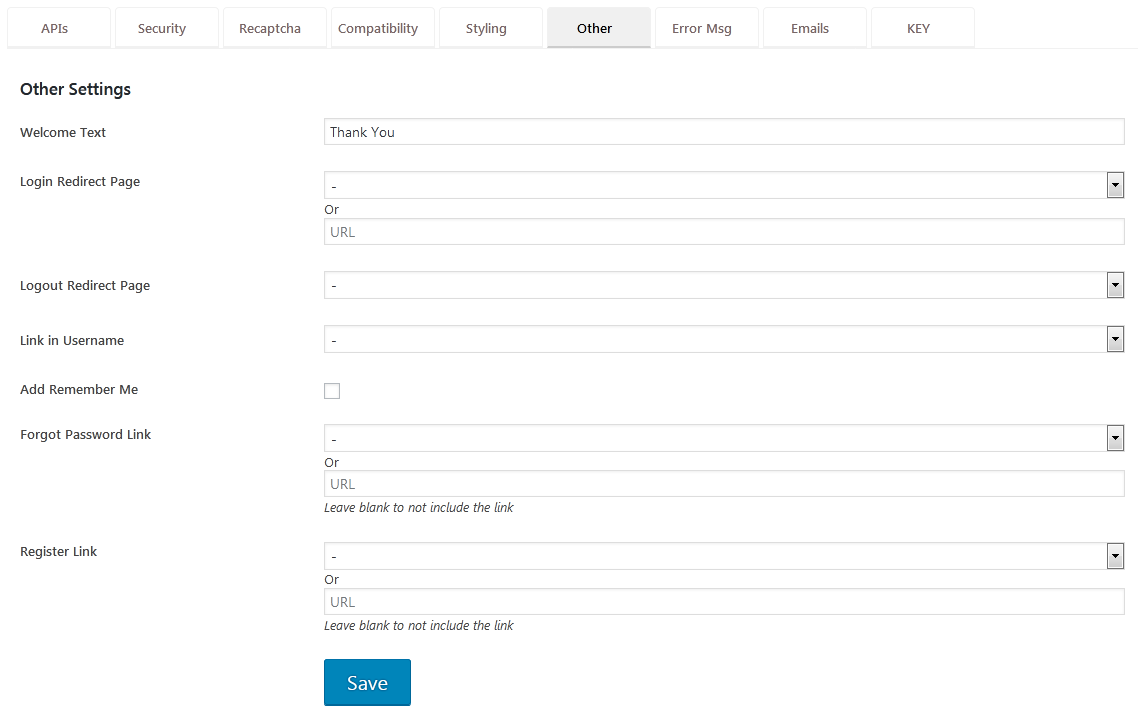
Other Settings View
Plugin styling and login widget settings. Update Welcome Text, This text will be inserted before user's display name after login.
Customized Redirection After Login
To restrict a page from non logged in users and redirect users to requested URL after successful login, add this code in the top of the page template which you want users to be able to access after successful login.
if(!is_user_logged_in()){
wp_redirect('http://www.example.com/login/?redirect='.fb_login_wid::curPageURL());
exit;
}
Change "http://www.example.com/login/" to your login page url.
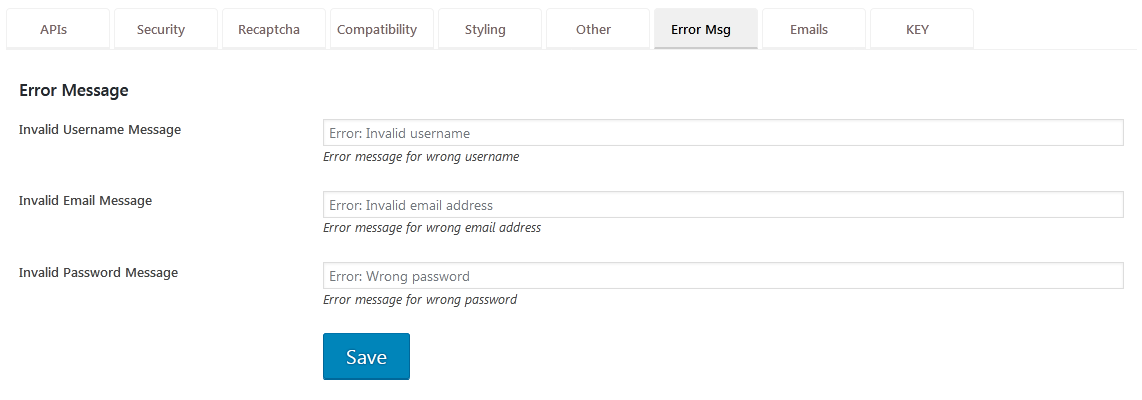
Error Message Settings
Set Customized Error Messages in case of login error.
Email Settings View

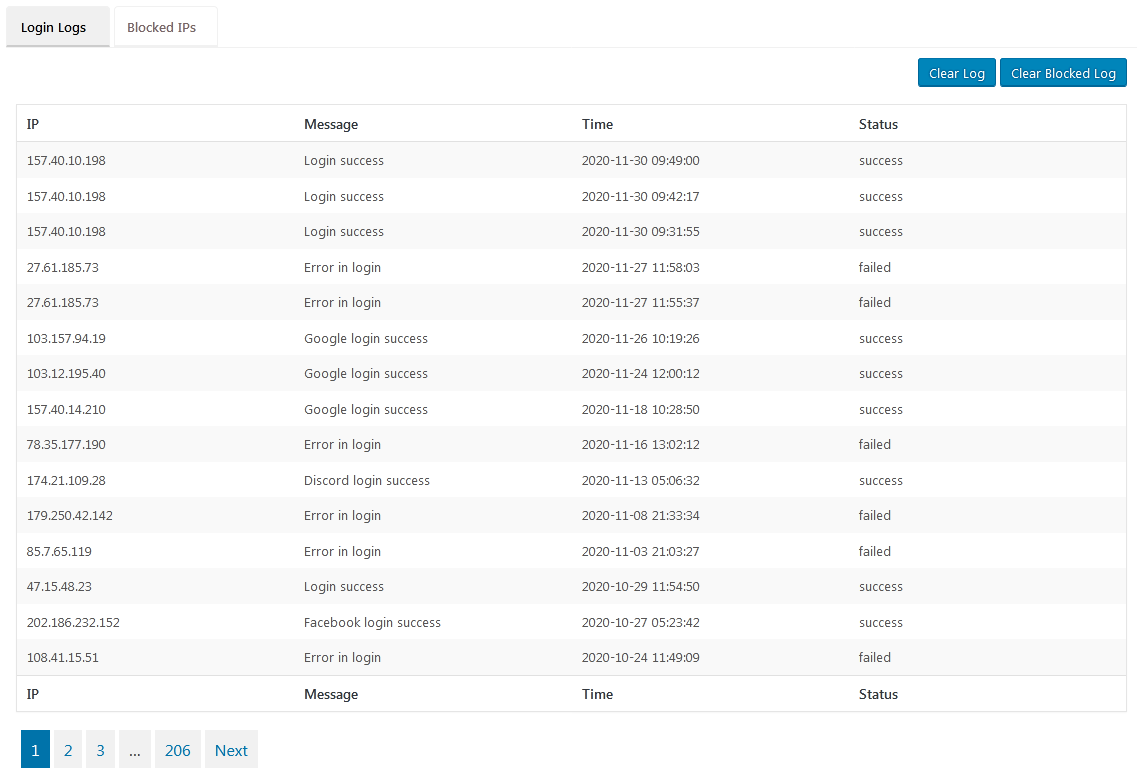
User Login Log

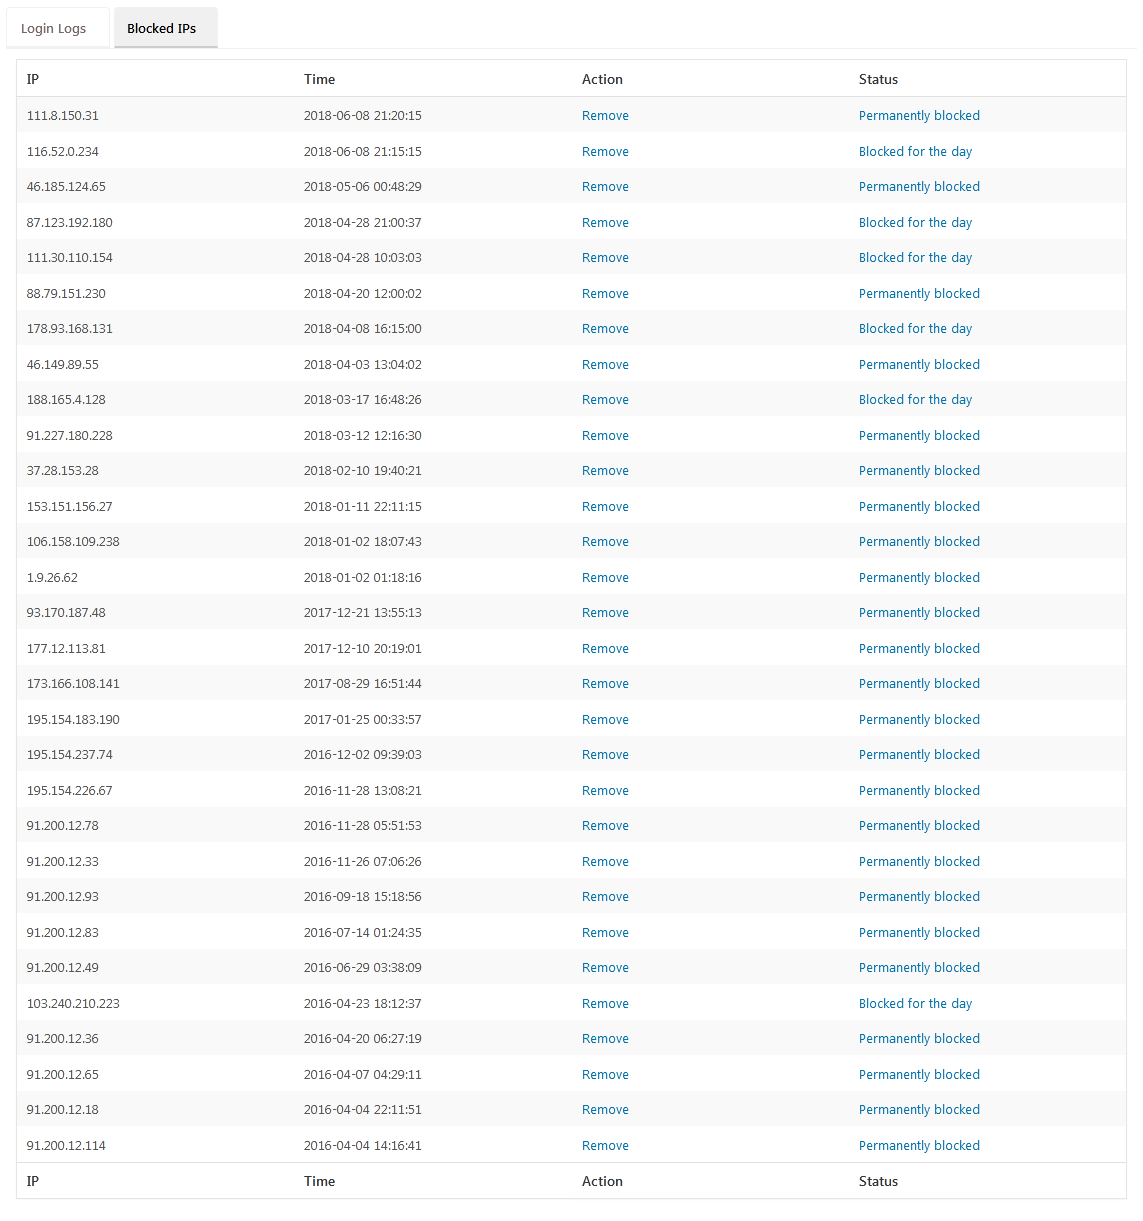
Blocked IPs

IP gets Blocked after a certain numbers of wrong login attempts ( attempt number can be set from plugin settings page ). Login Block can me removed manually from this plugin page or the Block gets removed automatically after 1 day. IPs can be blocked permanently ( Hard Blocked ), these IPs will not be removed after 1 day.
Plugin Key
Each plugin comes with an unique key. This key ensures that your plugin has a valid license. Plugin key can be used to get informations about the latest version available to download. Key has to be entered in the plugin settings section.
Content Restrict Add-on ( FREE )
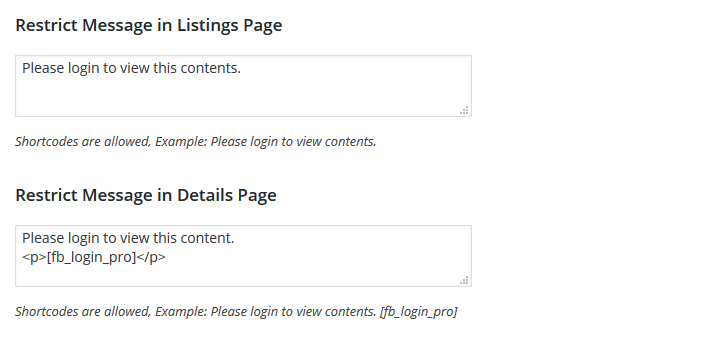
This plugin now comes with this FREE Addon. Restrict selected content of wordpress pages, posts, custom post types from visitors. Full page contents or partial contents can be restricted. Only logged in users are able to view the content.
Content Restrict Addon Details
The restriction can be applied to the_content() and the_excerpt() functions, where ever these are used in your theme template. The restriction will not be applied to get_the_content() or get_the_excerpt() functions.
Select this checkbox in your Post edit page to restrict contents of that page. This will restrict the Full page content.
Restrict Partial page contents
Example :
Paragraph 1. Suppose this is the first paragraph of a page.
[restrict_afo message="Please login to view this part"]
This is a restricted content. Only logged in users will be able to view this.
[/restrict_afo]
Paragraph 2. Suppose this is the second paragraph of a page.
AP Email Template Add-on ( FREE )
This is an Email Template addon plugin for PRO plugins available at aviplugins.com. This will allow you to customize Email Template easily, make your emails look more professional. This Add-on is FREE to download. Once you purchase Facebook Login Widget (PRO) you will get a plugin KEY. Please use that KEY to download this Add-on.
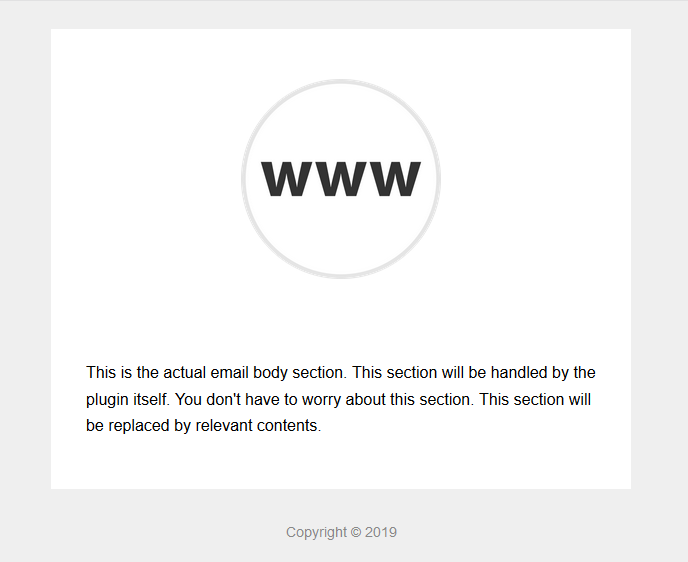
Sample Email Template Easily Customizable
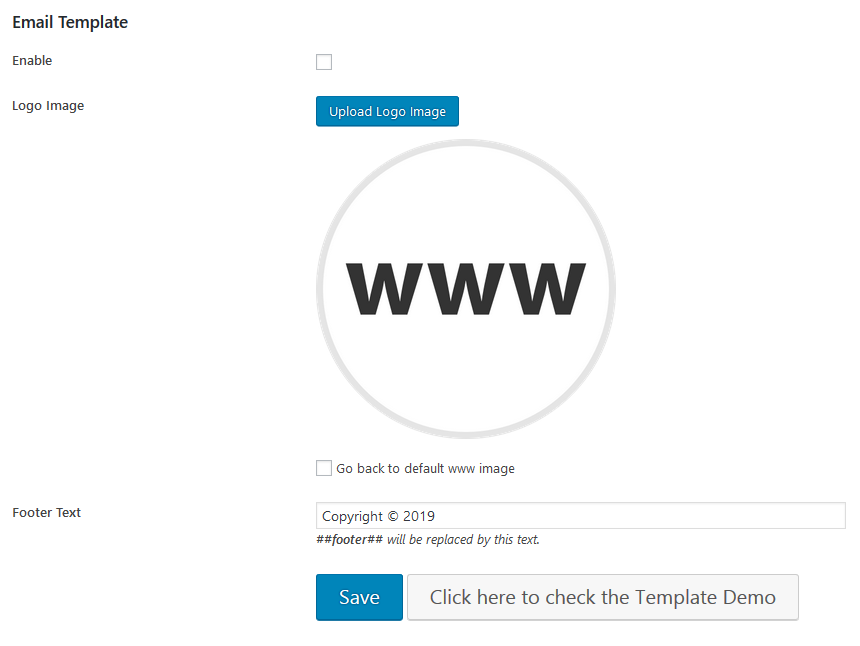
Email Template Settings
Change the WWW LOGO to your LOGO and change the Footer text. It's Easy!
Facebook API Settings
To enable facebook login you will have to create a new facebook API application. The steps are easy. A details explanation of how to create your facebook application and how to get facebook App ID, App Scecret are provided below. Plase follow the instructions carefully.
Facebook API Setup Details
To start with, navigate your browser to the Facebook Developers page. You'll be asked to login to your Facebook account.
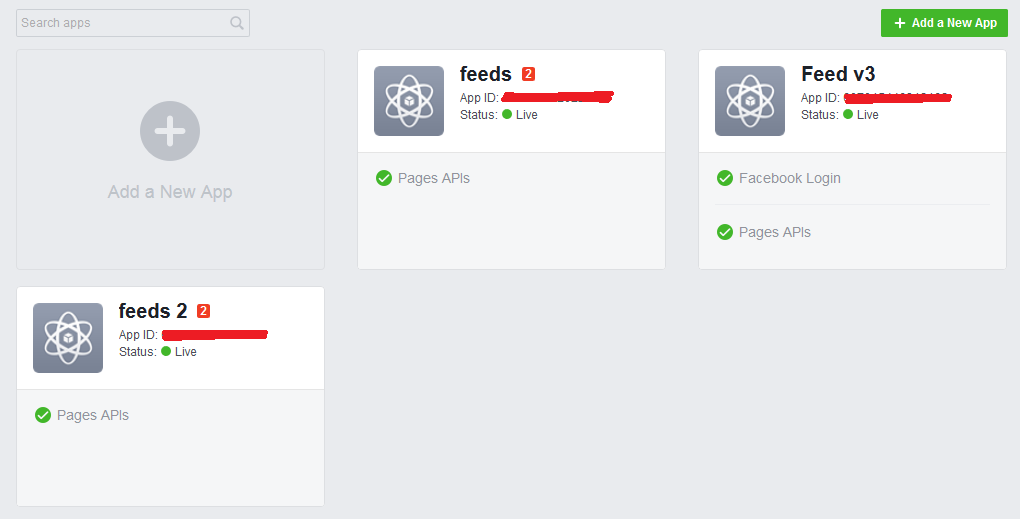
Once logged in, you'll see a screen similar to this:
To begin, click "Add a New App", you'll find a screen that looks like this:
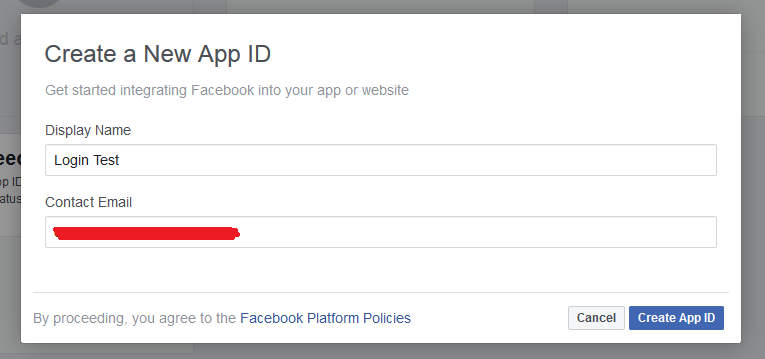
You will be prompted to enter the name of your app ( Display Name ) - whatever you choose will be fine, so just pick something relevant to the website or application it will be used for.
For Contact Email you can use any email address of yours.
Now Click on the "Create App ID". You'll be redirected to a page like this.
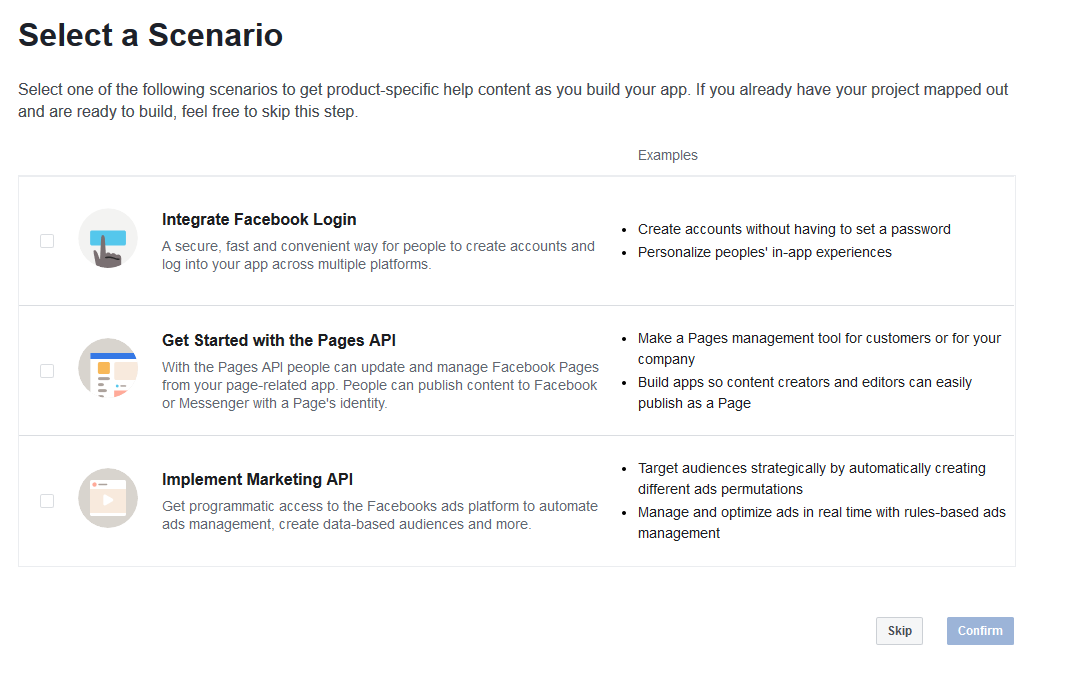
Now you need to select Integrate Facebook Login and click Confirm. You'll be redirected to a page like this.
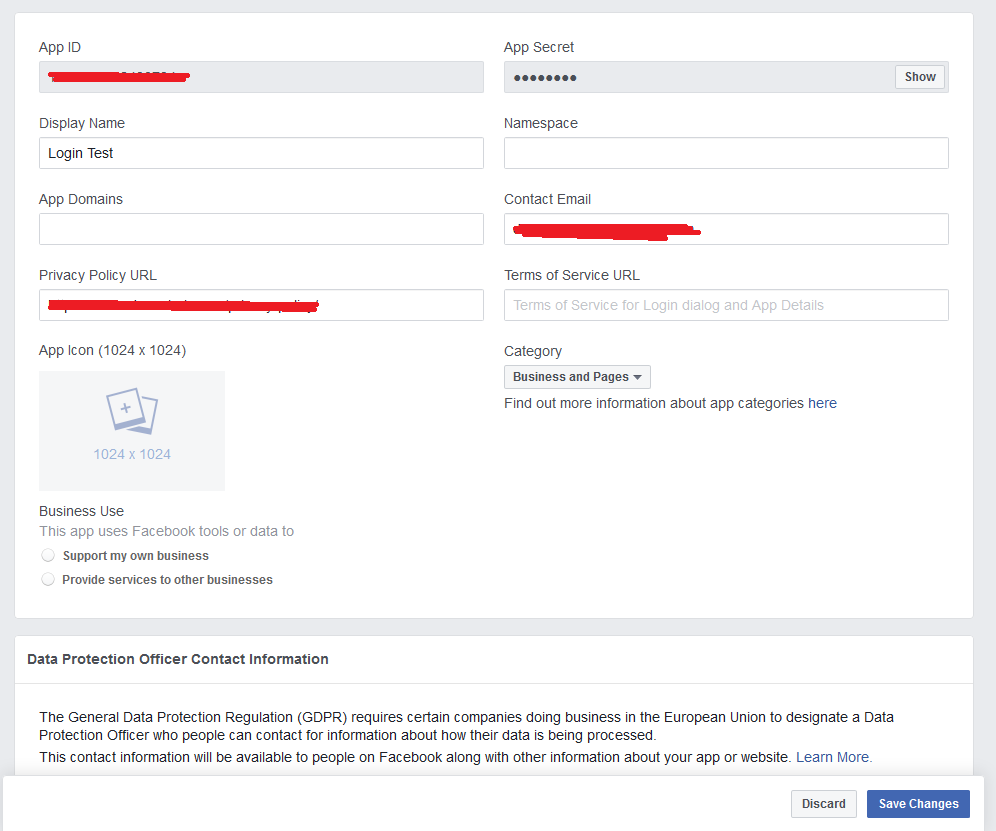
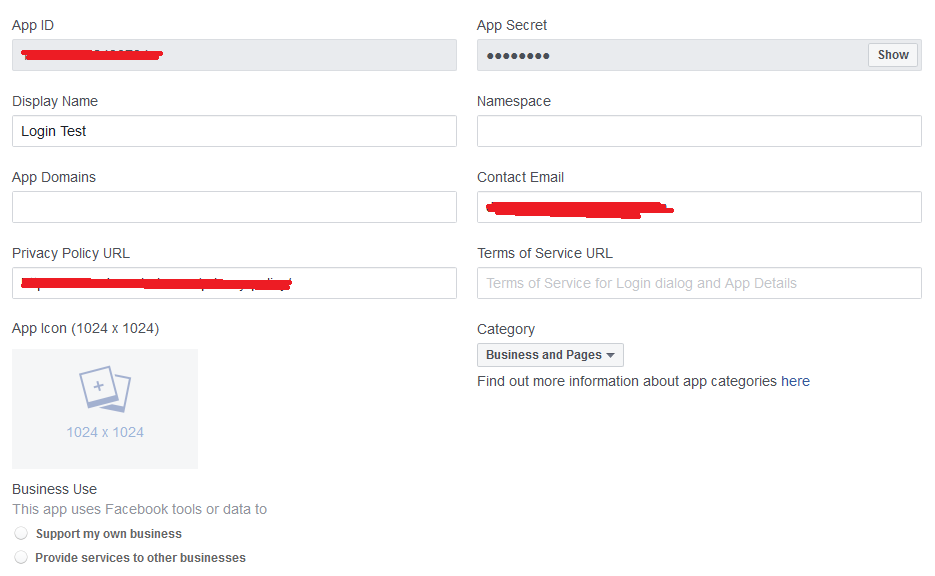
Your Facebook App is successfully created. Now please enter Privacy Policy URL.
For the Category of the App, just pick something relevant ("Apps for Pages" is a good choice).
Click Save Changes
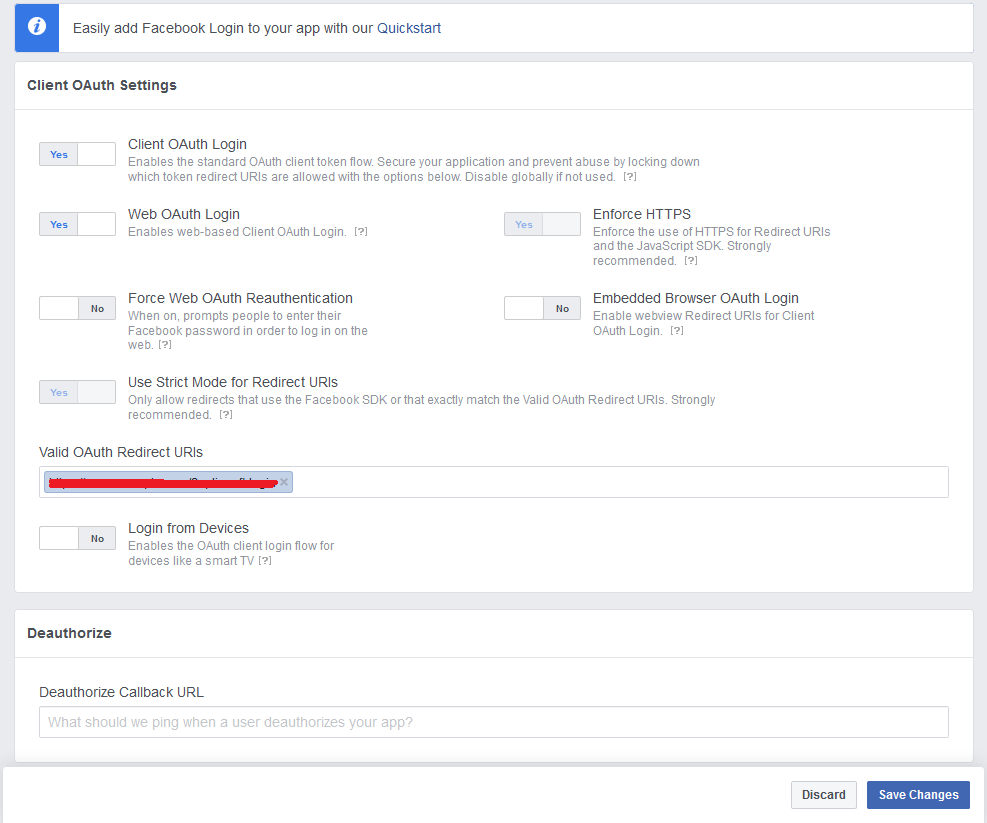
Now you need to configure the Facebook Login App. Click on Facebook Login -> Settings
In Valid OAuth Redirect URIs enter the URL displayed in the Facebook Login Widget (PRO) plugin. Example - https://www.example.com?fblogin=
Click Save Changes
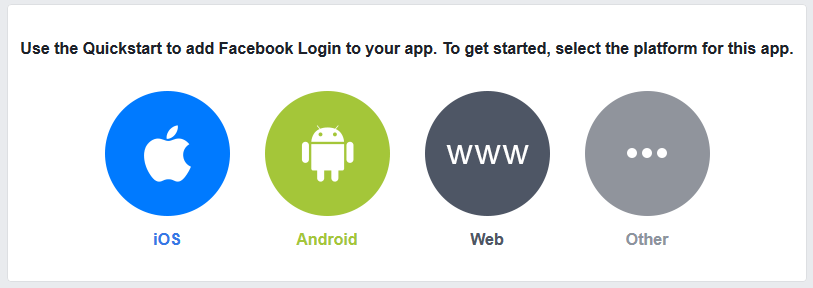
Now goto Facebook Login -> Quickstart
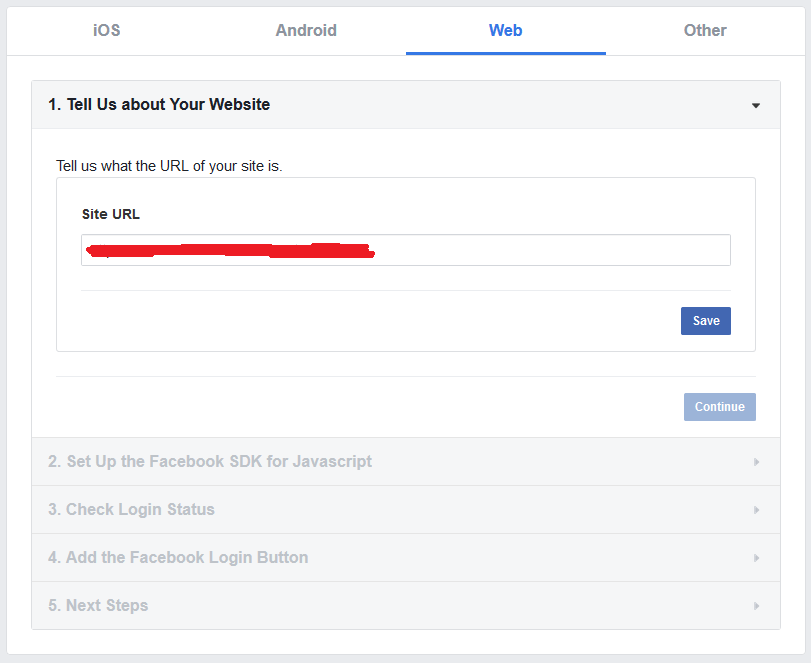
Click on "Website" icon. You will need to enter your Site URL in the next step.
Enter your Site's URL where the plugin is installed. And Save the settings.
Your New App is ready but it is not LIVE yet. To make the App LIVE click on Status "Off" button on top of the page and make it LIVE.
Your Facebook App is now ready to use. Click on Settings -> Basic
Your App ID will be visible, but your App Secret will be obfuscated. To reveal your App Secret, simply click the "Show" button. Be sure to copy down the App ID and App Secret - you'll need to enter these settings to use the plugin.
That's It.
Google API Settings
To enable login with your google account's username & password you will have to create a new Google API. The steps are not that hard. A details explanation of how to create your Google API and how to get required keys to get your Google login working are provided below. Plase follow the instructions carefully.
Google API Setup Details
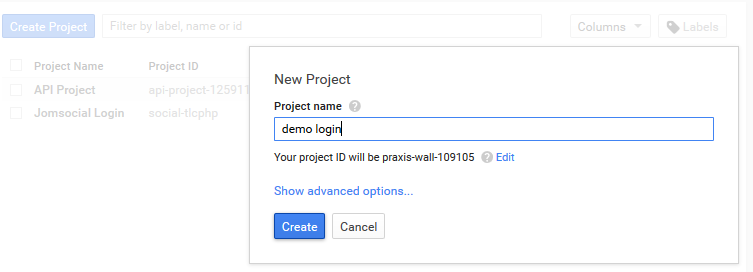
1. Sign-in to Google and go to Google API console, A page will open like this. Click on the Create Project Button.
A box should pop-up, enter your Project name, click Create.
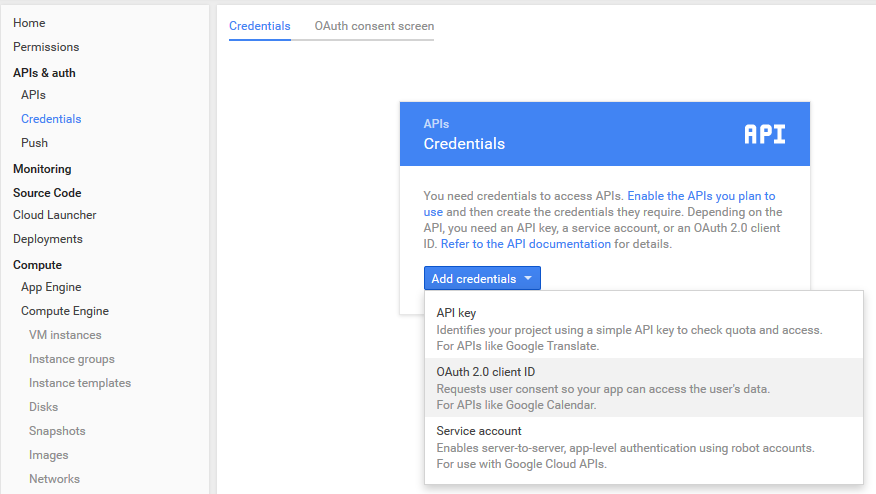
2. Once the project is created click on the APIs & auth -> Credentials from the left navigation, a new page will open.
Now click on the Add Credentials then select OAuth 2.0 Client ID. A new page will open like this.
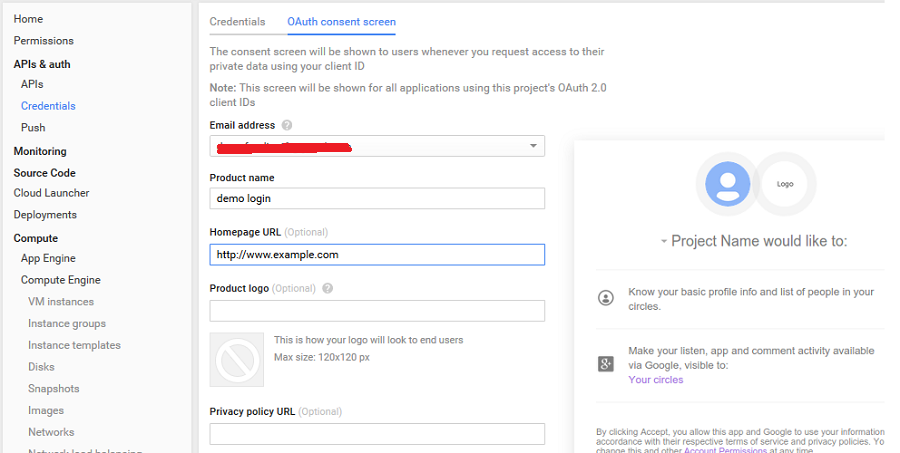
Now click on the Configure consent screen tab. A new page will open.
Enter Email address, Product name, Homepage URL and click on Save.
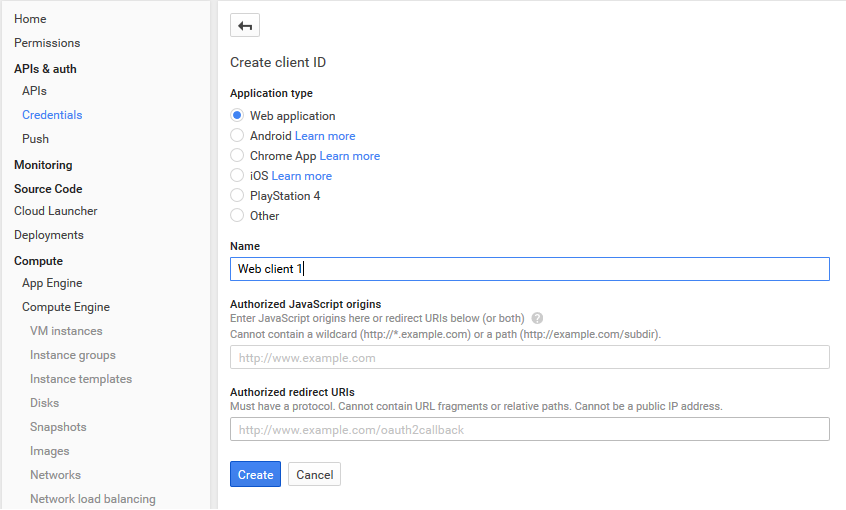
Now Click on Credentials tab from the left navigation. A page will open like this.
Now select Web Application, Enter Name and in the Authorized redirect URIs enter your SITE URL with the trailing slash ( http://www.example.com/ ). Click Create button.
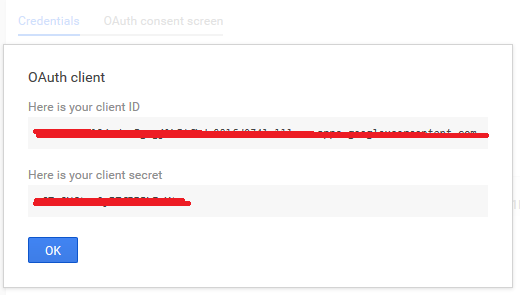
You will get your Client ID and Client Secret.
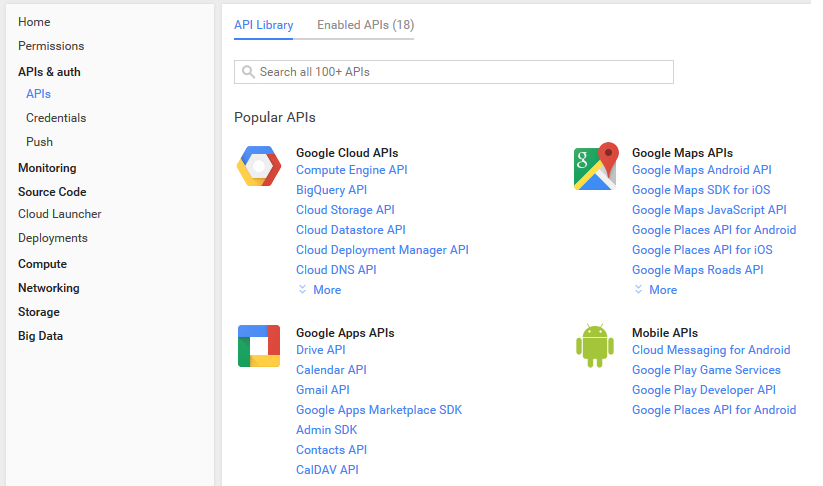
Now for the API Key click on the APIs tab from the left navigation. A page will open like this.
Click any one API listed here and Enable that.
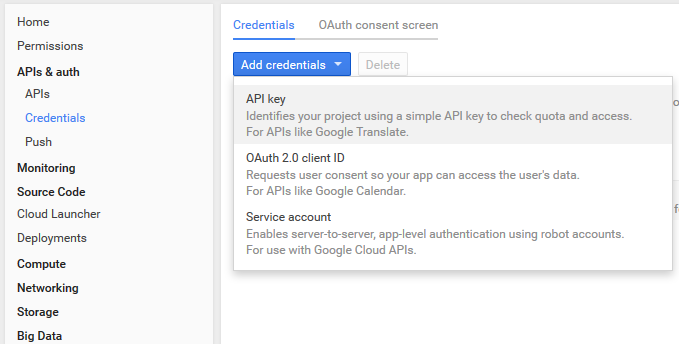
Now click on the Credentials tab from the left navigation. And click Add Credential select API Key.
A pop-up will open like this.
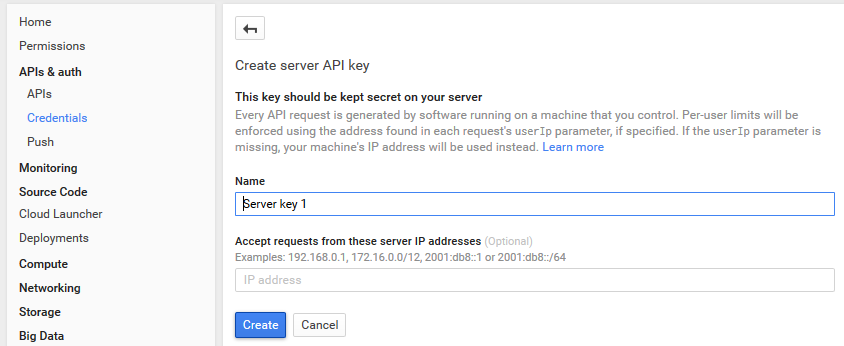
Click on the Server Key button. A new page will open.
Enter Name and click on Create
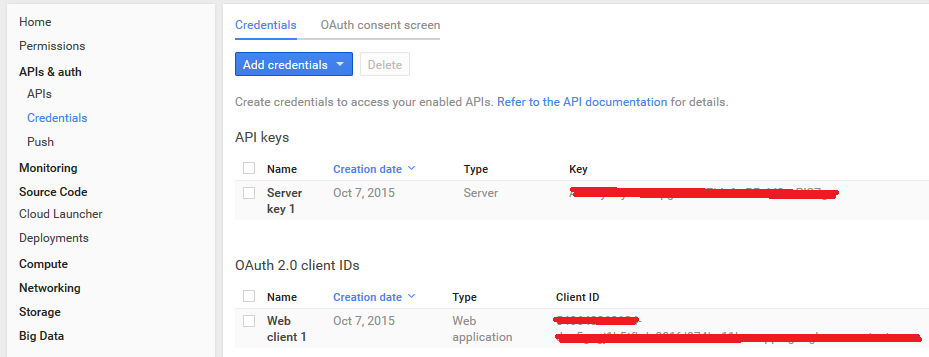
Your Public Access Key will be generated. The API KEY is your Developer Key.
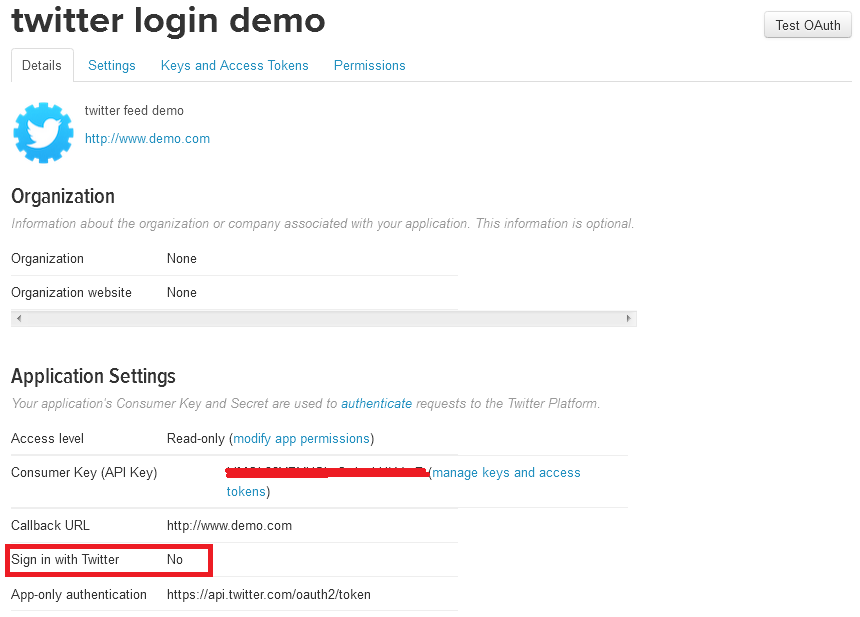
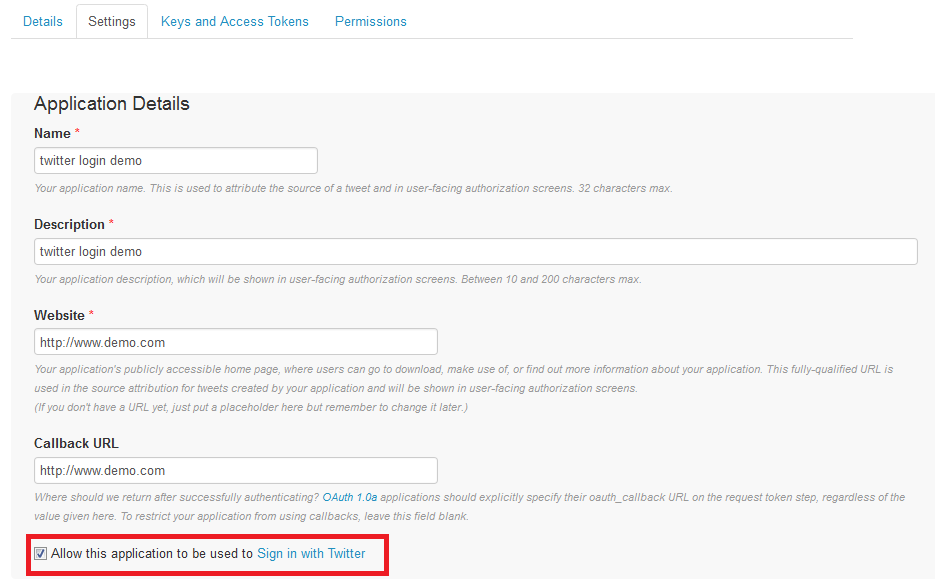
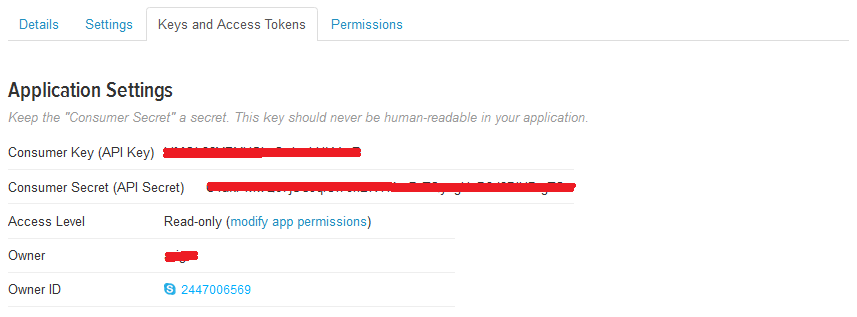
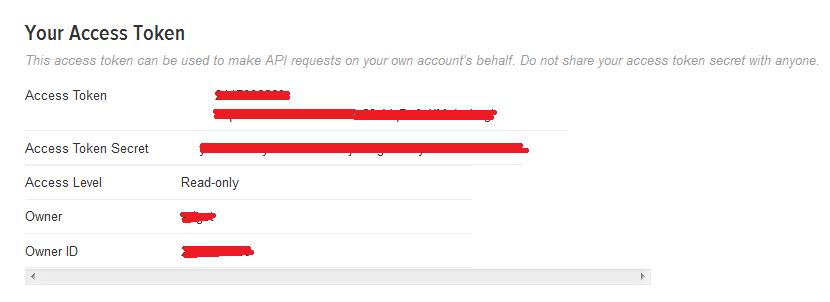
Twitter API Settings
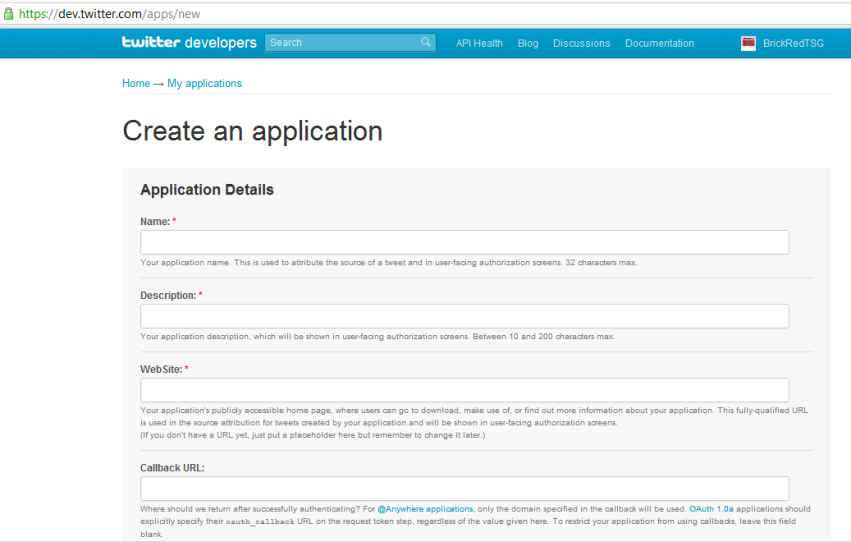
To enable login with your Twitter account's username & password you will have to create a new Twitter App API. The steps are easy. A details explanation of how to create your Twitter Application API and how to get required keys to get your twitter login working are provided below. Plase follow the instructions carefully.
LinkedIn API Settings
To enable login with LinkedIn account's username & password you will have to create a new LinkedIn App API. The steps are easy. A details explanation of how to create your Linkedin Application API and how to get required keys to get your LinkedIn login working are provided below. Plase follow the instructions carefully.
LinkedIn API Setup Details
1. To start with, navigate your browser to the LinkedIn Developers page. You'll be asked to login to your LinkedIn account.
Once logged in, you'll see a screen similar to this:
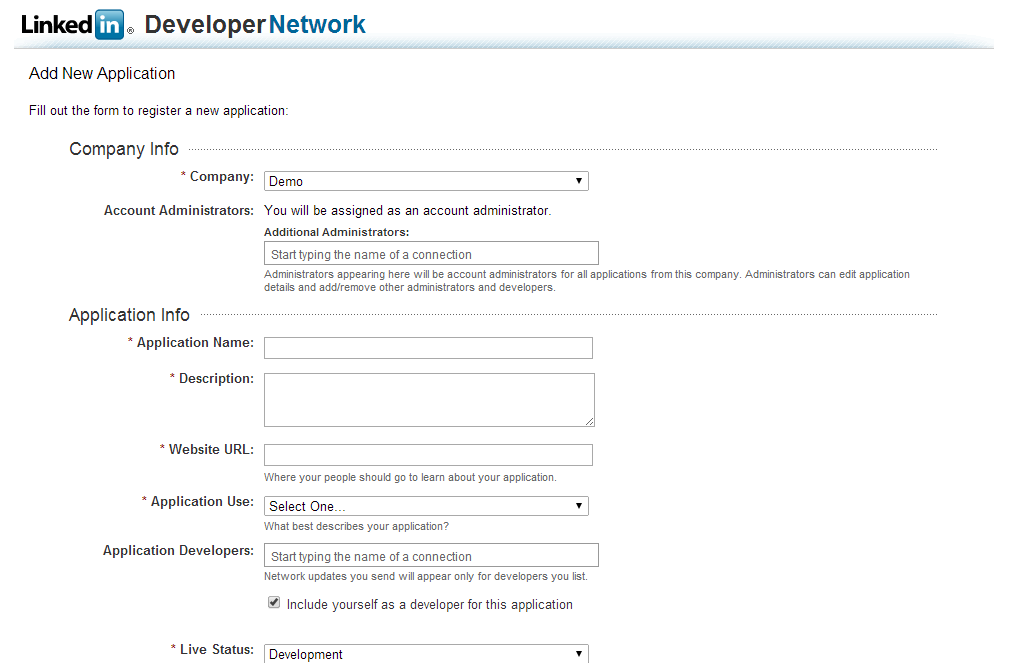
2. To begin, click "Add New Application".
After you click "Add New Application", you'll be taken to a screen that looks like this:
You will be prompted to enter the name of your Application Name - whatever you choose will be fine, so just pick something relevant to the website or application it will be used for, Description, Website URL, Application Use Etc. Enter your site url in the Website URL field.
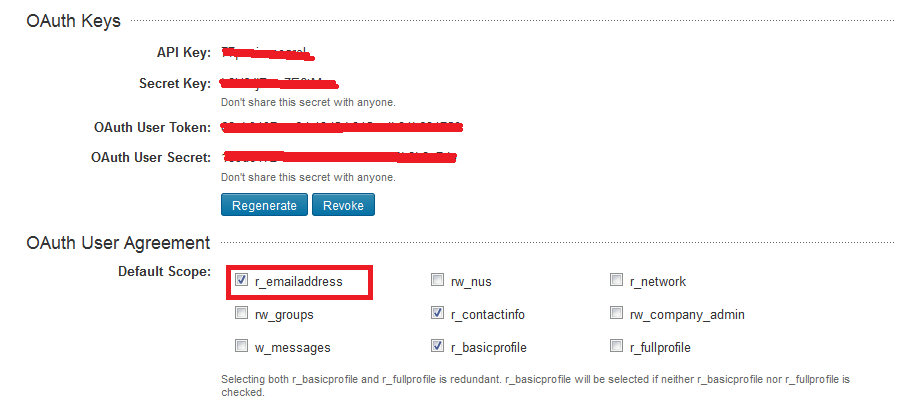
3. Dont forget to check the r_emailaddress field in the "OAuth User Agreement" section
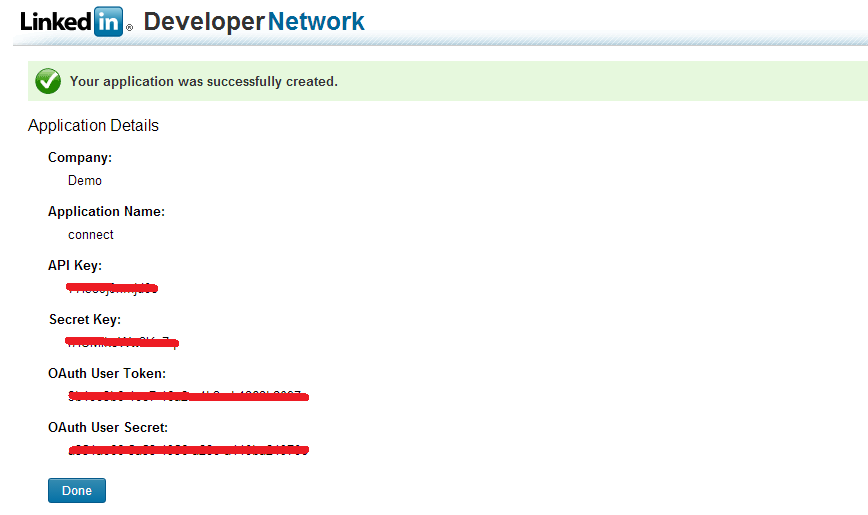
4. After you complete the form to register your application, you'll be taken to a screen that looks like this:
5. Your API Key, Secret Key will be visible. Be sure to copy down the API Key and Secret Key - you'll need to enter these settings to use the plugin.
Instagram API Settings
To enable login with Instagram account's username & password you will have to create a new Instagram App API. The steps are easy. A details explanation of how to create your Instagram Application API and how to get required keys to get your Instagram login working are provided below. Plase follow the instructions carefully.
Instagram API Setup Details
1. To start with, navigate your browser to the Instagram Developers page. Now login to your Instagram account.
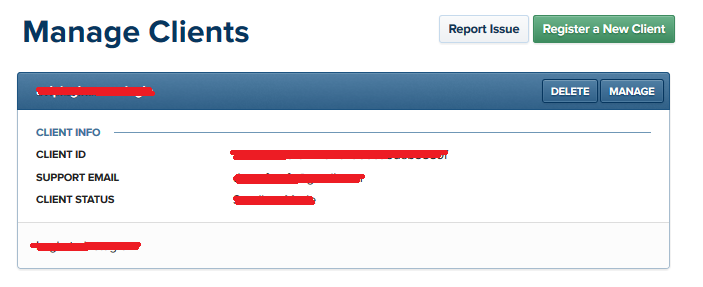
Once logged in, click on Manage Clients you will be redirected to a page like this:
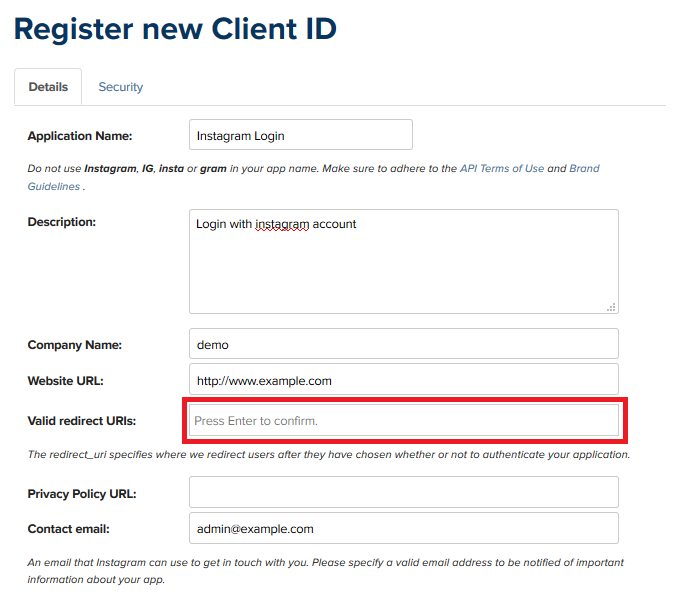
2. Now click on the Register a New Client button. You will see a page like this:
3. Enter required fields. Make sure to enter Valid redirect URIs exactly as provided in the plugin settings section. Click on Register
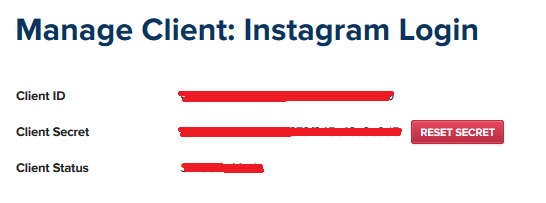
4. Your new Instagram APP will be created. Now click on the MANAGE button of the newly created APP. Here you will get the Client ID and Client Secret for your Instagram APP.
Amazon API Settings
To enable login with your Amazon account's username & password you will have to create a new Amazon App API. The steps are easy. A details explanation of how to create your Amazon Application API and how to get required Client ID to get your Amazon login working are provided below. Please follow the instructions carefully.
Amazon API Setup Details
First, you will need to register your website as an Application on the App Console.
Register Your Login with Amazon Application
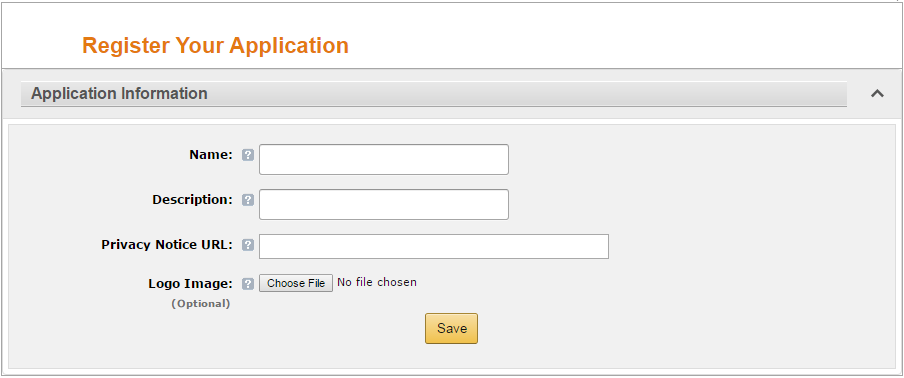
In the App Console register a new application by clicking the Register new Application button. The Register Your Application form will appear.
Note: You will be redirected to Seller Central, which handles application registration for Login with Amazon. If this is your first time using Seller Central, you will be asked to setup a Seller Central account.
In the application details page, add basic details about your product. These details will be used on your website.
Name Shown to Users. This is the name displayed on the consent screen when the users agree to share the information with your application. This name applies website versions of your application.
Description. The description helps you differentiate each of your Login with Amazon applications and is not displayed to users.
Privacy Notice URL. The Privacy URL is the location of your company or application's privacy policy. It is also displayed on the consent screen. This link is displayed to users when they login to your application (for example, https://www.example.com/privacy.html).
Logo Image File. This logo is displayed on the sign-in and consent screen when users log into your website. The logo will be automatically resized to 50 x150 pixels. The following formats are accepted: PNG, JPEG, GIF.
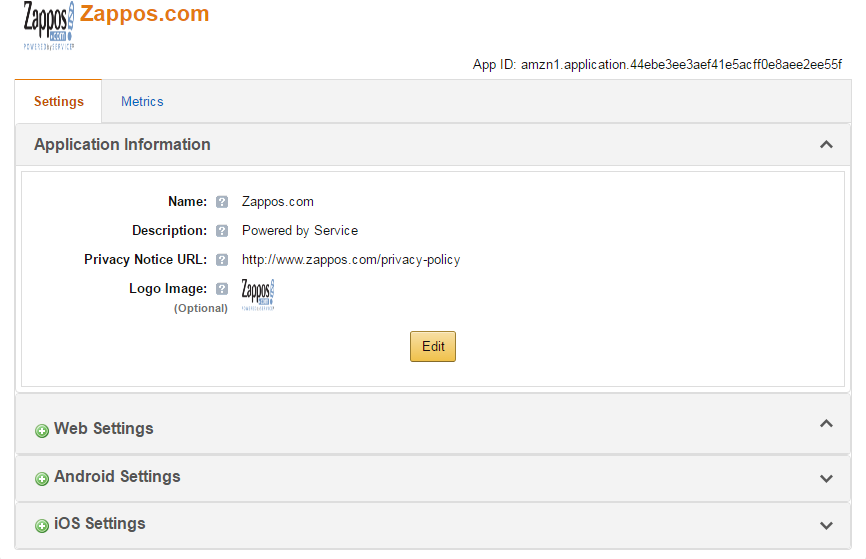
When you are finished, click Save to save your changes. Your sample registration should look similar to this:
Add a Website to your Application
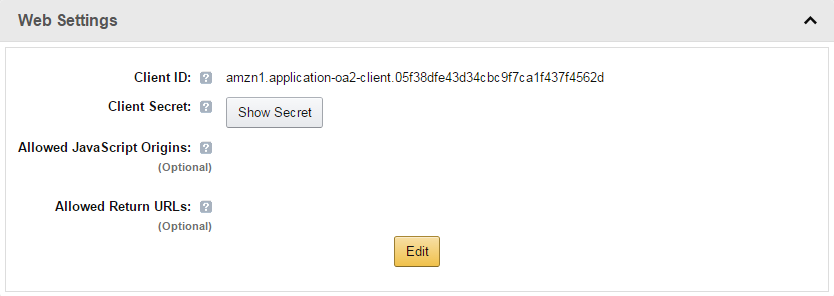
From the Application screen, click Web Settings. You will automatically be assigned values for Client ID and Client Secret. The client ID identifies your website, and the client secret is used in some circumstances to verify your website is authentic. The client secret, like a password, is confidential. To view the client secret, click Show Secret.
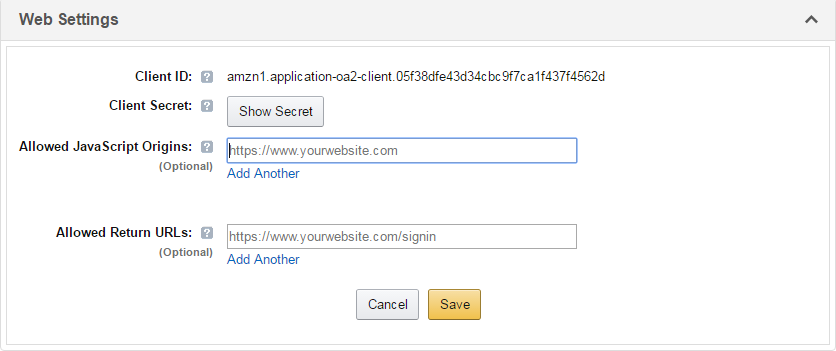
To add Allowed JavaScript Origins or Allowed Return URLs to your application, click Edit.
Note: To use Login with Amazon with a website, you must specify Allowed JavaScript
Origins. Specify Allowed JavaScript Origins ( It should be your site URL ) to provide a popup authentication experience to your users.
An origin is the combination of protocol, domain name and port (for example, https://www.example.com:8443). Allowed origins must use the HTTPS protocol. If you are using a standard port (port 443) you need only include the domain name (for example, https://www.example.com).
Adding your domain here allows the SDK for JavaScript to communicate with your website directly during the login process. Web browsers normally block cross-origin communication between scripts unless the script specifically allows it.
To add more than one origin, click Add Another.
Facebook Login Addon Pack
This is an Addon plugin for Facebook Login Widget (PRO). It will enables Microsoft Live, Yahoo, Line, Mixer & Meetup Account logins for your users. This plugin will not work individually. After activation these login icons will be available with other social logins icons.
$
2.00
More Info
Note *
In every occasion when you create application API for the plugin and you need to enter a website address. (You will have to enter website address for each application no matter its Facebook, Google, Twitter or LinkedIn API )
Please make sure you enter your live site url where you are installing the plugin. Each application can work with only one url.
For example if your site is http://www.example.com then Please enter http://www.example.com/ (With trailing slash)
Otherwise the plugin may not work properly.
Multilingual Note *
Facebook Login Widget (PRO) is a multilingual plugin. To use this plugin in your native language you have to translate the plugin text in your language. Please click here for a sample flp-da_DK.po Danish language file. Once the translation is done please mail the translated file to demoforafo@gmail.com and we will convert that file and mail you back with the translated .MO file, which you have to put in the languages directory inside the plugin.
License and Agreement
Please read the plugin license